Ваш кошик
Ви нічого не додали до кошика
Перейти до категорії:


У світі 3D-друку такий дефект як “слонова нога” зустрічається досить часто, і на наш погляд йому не приділяють достатньо уваги.
Для більшості областей застосування 3D-друку цим недоліком можна знехтувати, оскільки він не сильно впливає на кінцевий результат.
Однак коли справа доходить до практичних додатків, слонова нога може представляти серйозні проблеми. Цей дефект різко знижує допуски, що значно ускладнює припасування деталей одна до іншої.
Наприклад, ви хочете підігнати одну деталь до іншої, але стикаєтеся з проблемою, тому що перший шар значно більший за наступні.
В архітектурній сфері інженери можуть використовувати 3D-друк для перевірки та визначення точності конструкції до того, як вона буде виготовлена у значних та дорогих масштабах. Якщо у відбитку є дефект, він спотворює уявлення кінцевого продукту.
Наприклад, якщо інженер-будівельник проєктує будівлю, а відбиток несправний, він неправильно зображати структуру будівлі.
Ми надаємо послуги 3D-друку вже кілька років, і наявність слонячої ноги для більшості проєктів наших клієнтів є неприпустимим дефектом.
Сподіваємося, що своєю передмовою ми переконали вас, що слонячої ноги все-таки варто позбутися. І в цьому пості ми познайомимо вас із базовими способами виправлення цієї проблеми.
Деякі наші рекомендації можуть бути складними для новачків. Але насправді набагато складніше НЕ знати, що робити, ніж мати чітке покрокове керівництво.
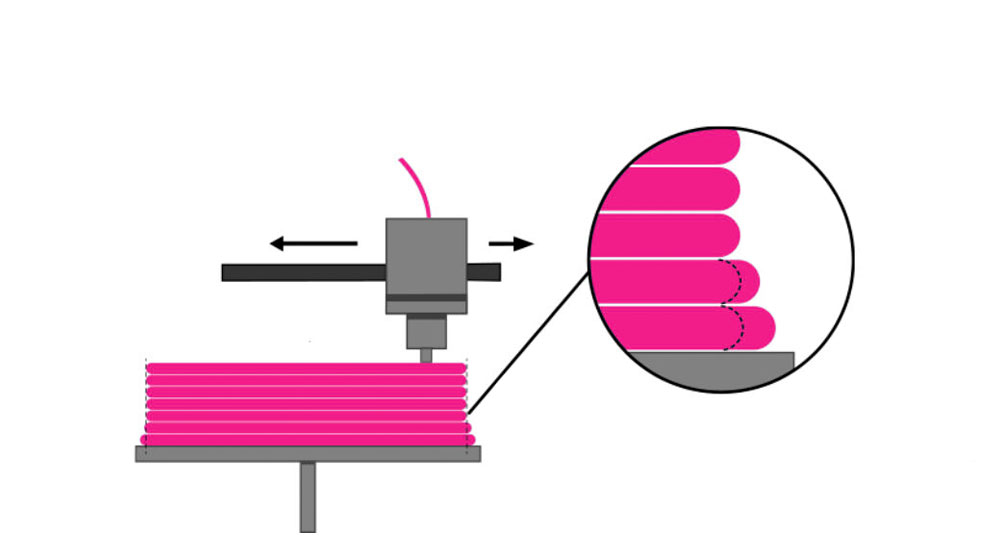
Слонова нога – це деформація 3D-моделі, що виникає під впливом температури та ваги моделі.
Верхні шари тиснуть на ще не остиглий перший шар і під впливом маси об'єкта перший шар розплющується, а геометрія деталі спотворюється. Відповідно, чим вище ваша модель, тим більшою мірою проявляється ефект слонячої ноги.
У нашому блозі ми вже неодноразово згадували, що друк першого шару та калібрування платформи мають критичне значення для отримання якісних відбитків. І, описуючи причини виникнення та способи усунення слонячої ноги, ми знову змушені повернутися до цієї теми.
Серед усіх численних обмежень та проблем, з якими стикаються користувачі при 3D-друку, слонова нога залишається однією з найпростіших для вирішення. Вам потрібно просто провести кілька тестових операцій, щоб визначити який саме фактор у вашому випадку викликає цей ефект.
Виправлення практично будь-якої проблеми 3D-друку починається з калібрування платформи. І слоняча нога не виняток.
Цей ефект може виникнути через неправильно відкалібрований стіл або неправильно налаштовану висоту сопла.
Розташування сопла надто близько до платформи 3D-принтера призводить до того, що перший шар надто вдавлюється у платформу та розплющується.
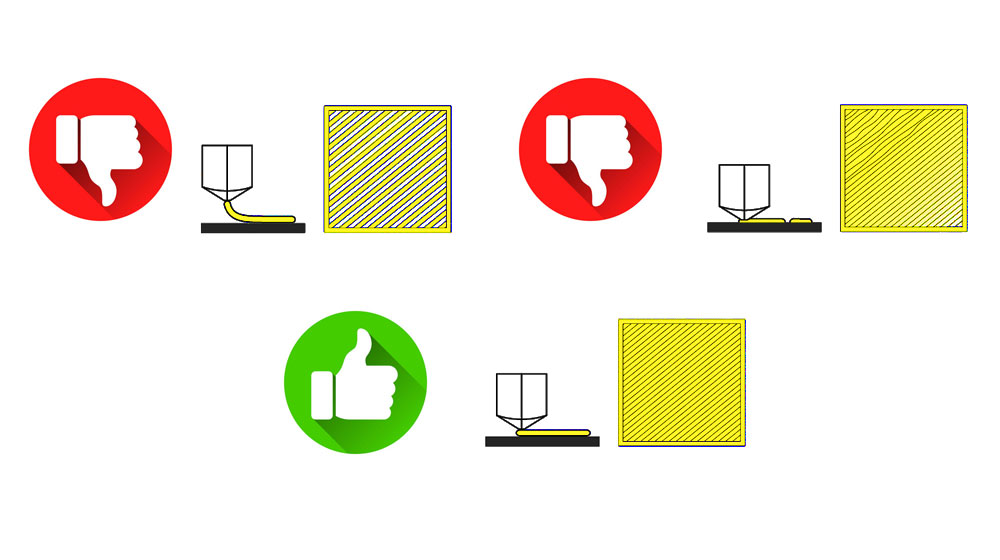
Принцип калібрування полягає в тому, щоб сопло знаходилося на однаковій відстані від платформи по всій робочій області принтера.
Крім того, як це часто буває в 3D-друку, правильне вирівнювання платформи може в цілому привести до поліпшення якості друку ваших проєктів.
Калібрування платформи 3D-принтера - це ключовий фактор 3D-друку, що дозволяє усунути багато проблем 3D-друку.
Висока температура столу не дозволяє шару достатньо охолонути.
Наплавлення на нього наступних шарів деталі призводить до стискання об'єкта та прояву слонячої ноги.
Зазвичай температура столу виставляється відповідно до рекомендацій виробників пластику. Правильно підібрана температура забезпечує відмінну адгезію шару з платформою.
Якщо ви спостерігаєте ефект слонячої ноги, спробуйте знизити температуру платформи.
Не поспішайте під час виконання цього процесу. Рекомендується поступово зменшувати температуру на 5 °C, доки ви не почнете отримувати якісні відбитки.
Якщо ви досягли мінімальної рекомендованої температури для платформи, але проблема не зникла, швидше за все слонячу ногу викликає інша причина і вам слід розглянути інші варіанти.
У більшості слайсерів відключено охолодження перших шарів. Відключення вентиляторів на першому шарі забезпечує відмінну адгезію деталі до платформи.
Але ми вже з'ясували, що слонова нога з'являється, коли перший шар не встигає охолонути.
Збільшення початкової швидкості вентилятора до 5 або 10% забезпечить швидше охолодження філаменту та попередить сплющування початкового шару.
Для покращення адгезії рекомендуємо вам використовувати 3D-лак для друку.
Збільшення часу друку початкового шару – це також рішення, пов'язане з охолодженням, але замість активації/збільшення швидкості вентилятора або зниження температури столу ми встановлюємо невелику швидкість друку першого шару.
Це дасть йому час охолонути, перш ніж принтер почне друкувати другий шар.
Якщо перший шар не встиг охолонути, нанесення другого шару стискає перший шар. Ця проблема може призвести до неправильних розмірів вашої деталі не тільки по горизонталі, але і по вертикалі.
Очевидним є також і те, що використання якісного філамента для 3D-принтерів з однаковим діаметром по всій довжині забезпечує рівномірну екструзію та знижує ймовірність появи слонячої ноги.
Можливо, ваш принтер налаштований на переекструзію, і на початкових шарах видавлюється дуже багато пластику. Надмірне екструдування може бути пов'язане з тим, що ваше сопло знаходиться надто близько до платформи. Ми згадували про це у першому пункті нашого керівництва.
Ви можете відкалібрувати принтер, використовуючи наші посібники з налаштування кроків екструдера.
Як відкалібрувати кроки екструдера (E-steps).
Або можна просто зменшити швидкість потоку першого шару до 95%. Це не вплине на адгезію першого шару, але вплине на слонову ногу.
Рафт – це горизонтальна сітка, створена шляхом накладання ниток пластику на платформу.
Оскільки проблема слонячої ноги виникає між робочою платформою та першим шаром, рафт прийме цей удар на себе.
Цей спосіб безумовно позбавить вас від слонячої ноги, але він є скоріше обхідним шляхом, ніж розв'язанням проблеми.
Використовуючи цей варіант, ви отримаєте шорстку поверхню вашої деталі та вам доведеться витратити деякий час на видалення плоту. З усім тим, ви можете розглядати це як корисну альтернативу, особливо в тих випадках, коли вам потрібно помістити одну деталь в іншу.
Бувають випадки, коли позбутися слонових ніг взагалі неможливо. Усі варіанти здаються нездатними забезпечити очікувані результати.
Якщо для вас настроювання та калібрування принтера є виснажливим процесом, а невелика зміна 3D-моделі здається більш простим шляхом, то вибирайте цей варіант.
Все, що потрібно зробити, це додати невелику фаску під кутом 45° до нижньої частини вашої моделі. На малюнку зображено дві однакові деталі. Зліва деталь із фаскою, справа без.

Будь-яке програмне забезпечення для моделювання має набір функцій для створення фаски й зазвичай це не займає багато часу.
Верхні шари своєю вагою натиснуть на перший шар, а фаска компенсує появу слонячої ноги на вашому відбитку.
Ще більш простий метод позбавлення слонової ноги — це компенсація за допомогою слайсера. Cura, один з найбільш популярних і повсюдно використовуваних слайсерів, впровадив це налаштування у своє програмне забезпечення.
Цей параметр називається initial layer horizontal expansion (горизонтальное расширение первого слоя), знаходиться у розділі Shell (Стенки).
Ви також можете легко знайти його, ввівши в рядок пошуку слово elephant або слон в російській версії.
У Slic3r та PrusaSlicer цей параметр називається Elephant foot compensation.
У Slic3r ви можете знайти цей параметр тут: Print Settings tab -> Advanced settings
У PrusaSlicer параметр знаходиться в розділі Print settings - Advanced - Elephant foot compensation. Щоб отримати доступ до цього параметра, PrusaSlicer має бути у розширеному або експертному режимі.
У Simplify3D є налаштування "horizontal size compensation". За замовчуванням вона застосовується до всіх шарів, але ви можете обмежити її лише для друку першого шару.
Щоб розрахувати правильне значення компенсації, рекомендуємо надрукувати тестовий кубик. Після друку заміряйте розміри кубика у верхній і нижній частинах.
Припустимо, розміри кубика у верхній частині становлять 20,02 мм, а в нижній частині 20,3 мм (слонова нога).
Для розрахунку коефіцієнта компенсації підставте ці значення в наступну формулу:
(20,02-20,3)/2=-0,14.
Ми отримали негативне значення, і саме його потрібно встановити в слайсері. По суті, цей метод створює фаску без зміни самої моделі, а за допомогою слайсера.
Слонова нога на 3D-принтері - поширена помилка, яку легко виправити.
У цьому пості ми описали кілька підходів, які допоможуть досягти найкращих результатів.
Важливо розуміти, що пункти 1-5 дійсно розв'язують проблему слонячої ноги, тоді як пункти 6-8 просто приховують її.
Використання рафта позбавить вас слонячої ноги, але ви витратите більше часу і матеріалів і не отримаєте гладку поверхню нижнього шару.
Ми рекомендуємо спочатку спробувати простіші рішення, які не забирають багато часу.
Якщо ви визначили причину, яка спричиняє дефект слонячої ноги, то використовуйте конкретне рішення, спрямоване на усунення причини.
Такі проблеми, як слонова нога, можуть на деякий час завадити мотивації, але не можуть зупинити тих, хто досить зосереджений на досягненні очікуваних результатів.
Небагато тестів та терпіння і ви не тільки отримаєте якісні відбитки, але й набудете додаткового досвіду, який допомагатиме вам і у вирішенні інших завдань 3D-друку.
Якщо ви бажаєте розкрити приховані можливості 3D-друку, ви повинні самостійно розв'язувати ці невеликі проблеми. Навчайтеся і розвивайтеся, друкуючи чудові дизайни.
Вдалого друку!

 Ліцензії 3D-моделей (Creative Commons та інші): Що можна і не можна друкувати/продавати?
 Скільки насправді коштує 3D-друк: аналіз усіх витрат
 SILK пластик для 3D-друку: створення ефектних моделей
 Creality K1 Max проти Bambu P1S: Битва швидкісних 3D-принтерів
 Формати файлів для 3D друку: повне керівництво


